When AWS Proton was announced during Andy Jassy’s re:Invent keynote, we were intrigued.
We initially thought of it as a tool that could potentially change the way we build and manage platforms. As an organisation that does that for our customers, we understand the pain involved in creating and managing CloudFormation templates. We usually start out by creating templates for the underlying environment and for the pipelines. After that, we have to connect everything together using scripts to make it easier to deploy. Finally, we often use Service Catalog to provide self-service deployments of environments and applications.
It works but there were always some bumps on the way in the whole process. Configuring identity is a good example.
At RedBear, we always follow the least privilege principle. This means that we give users and roles only the permissions they need to perform their functions. In doing so, we often run into “Not authorized” errors. It could be that the CodePipeline role has no permission to decrypt using a CMK, for example. While we have built many patterns that use least privilege for many use cases and many combinations of resources, we still often run into this problem. After all, every application is different.
Could AWS Proton address the permissions challenge? The only was was to give it a try!
What is AWS Proton?
AWS Proton is a fully managed application deployment service for container and serverless applications. Engineering teams can use Proton to connect and coordinate all the different tools needed for infrastructure provisioning, code deployments, monitoring, and updates. Maintaining hundreds of microservices with constantly changing resources and CI/CD configurations is a difficult task for even the most capable platform teams.
AWS Proton aims to solve this by giving platform teams the tools they need to manage this complexity while making it easy for developers to deploy their code using containers and serverless technologies.
The official blog from AWS can be found here.
Getting Started with AWS Proton
Let’s spin it up. Initially, we are assuming the role of the Platform Engineer. The following steps will create the required templates.
- Create the Proton service role. This role is used by Proton to build the resources in your templates so it needs to have permissions to do so. In this case, we will give it Administrator permission for simplicity purposes (note, we don’t recommend this approach!). We will call it ProtonServiceRole.
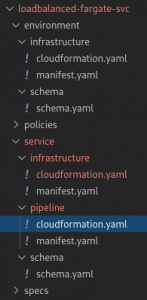
- Author your CloudFormation templates. For the purposes of this demo, we will use the sample templates provided in the official blog. You can clone the repo from here.
git clone https://github.com/aws-samples/aws-proton-sample-templates.git
You can see from the file structure that there are multiple CloudFormation templates.
- Package and upload the Environment templates to an S3 bucket.
cd ~/environment/aws-proton-sample-templates/loadbalanced-fargate-svc/ tar -zcvf env-template.tar.gz environment/ && aws s3 cp env-template.tar.gz s3://${artefacts_bucket_name}/env-template.tar.gz && rm env-template.tar.gz - Create an environment template. Go to AWS Proton console and select Environment templates under the Templates section. Click Create environment template.
 Fill in the S3 bucket name and S3 full path of the package that you uploaded from the previous step.
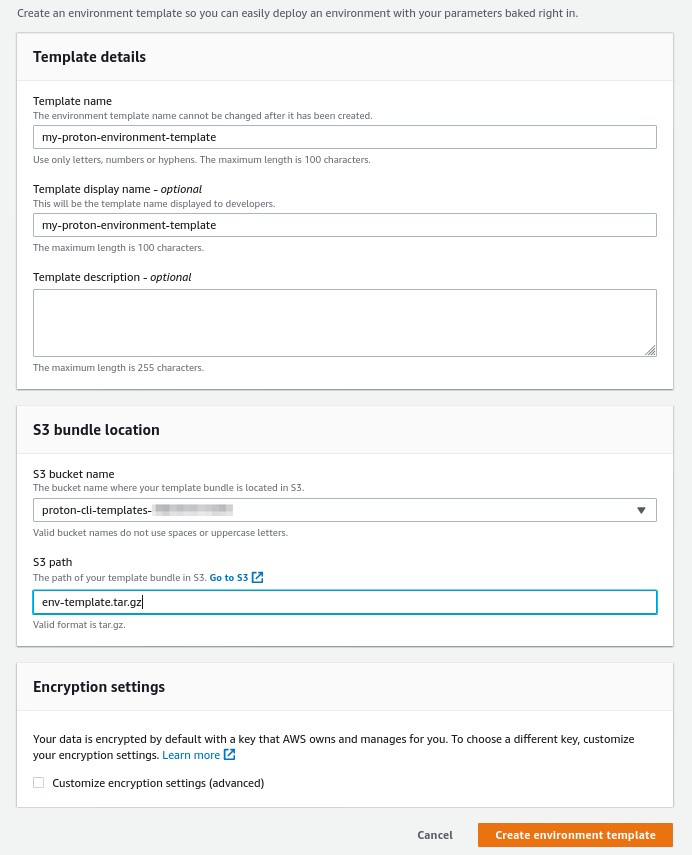
- Publish the template. Select the template. Select the template version and click Publish.

- Package and upload the Service templates to the S3 bucket.
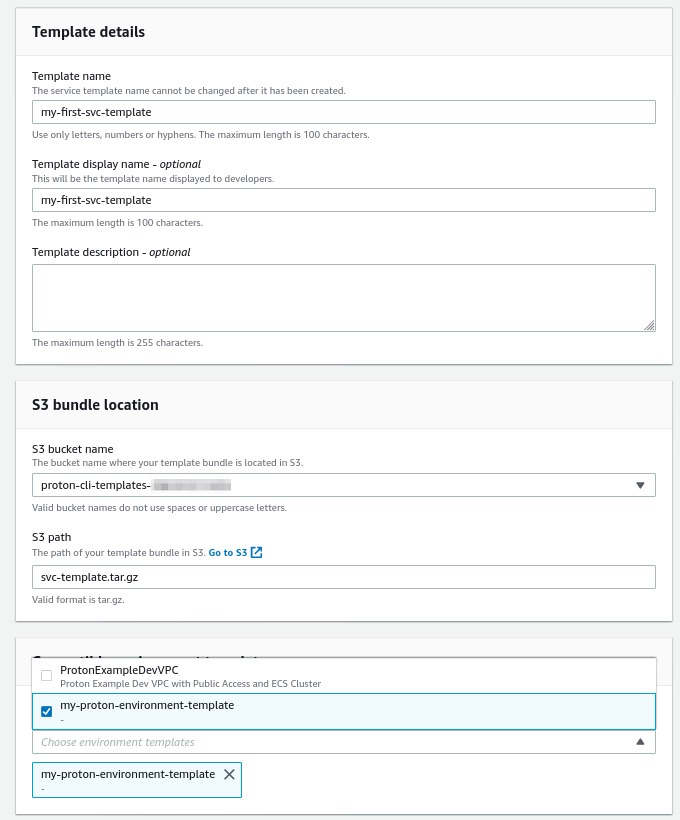
cd ~/environment/aws-proton-sample-templates/loadbalanced-fargate-svc/ tar -zcvf svc-template.tar.gz service/ && aws s3 cp svc-template.tar.gz s3://${artefacts_bucket_name}/svc-template.tar.gz && rm svc-template.tar.gz - Create a service template. Go to AWS Proton console and select Service templates under the Templates section. Click Create service template.
 Fill in the S3 bucket name and S3 full path of the package that you uploaded from the previous step. Select the environment template for where you want to deploy the service. In our case, we had two compatible environment templates. We select the one that was created in the previous steps.
- Publish the service template. Select the template. Select the template version and click Publish.
You can create and upload as many environment and service templates that you need and make them ready to use by your development team.
Below is the full script to deploy the templates from command line.
artefacts_bucket_name="proton-artefacts-bucket"
account_id=$(aws sts get-caller-identity --output text --query Account)

# create the artefacts bucket
aws s3api create-bucket --bucket ${artefacts_bucket_name} --region us-east-1

# create the Proton service role
role_arn=`aws iam create-role --role-name ProtonServiceRole --assume-role-policy-document
file://./policies/proton-service-assume-policy.json | jq ."Role"."Arn" | sed 's/"//g'`
aws iam attach-role-policy --role-name ProtonServiceRole --policy-arn arn:aws:iam::aws:policy/AdministratorAccess

# create the model for the custom API endpoint
aws s3 cp s3://aws-proton-preview-public-files/model/proton-2020-07-20.normal.json .
aws s3 cp s3://aws-proton-preview-public-files/model/waiters2.json .
aws configure add-model --service-model file://proton-2020-07-20.normal.json --service-name proton-preview
mv waiters2.json ~/.aws/models/proton-preview/2020-07-20/waiters-2.json
rm proton-2020-07-20.normal.json

# tell Proton to use the service role
aws proton-preview
--endpoint-url https://proton.us-east-2.amazonaws.com
--region us-east-2
update-account-roles
--account-role-details "pipelineServiceRoleArn=${role_arn}"

# create the environment template
aws proton-preview
--endpoint-url https://proton.us-east-2.amazonaws.com
--region us-east-2
create-environment-template
--template-name "proton-example-dev-env"
--display-name "ProtonExampleDevVPC"
--description "Proton Example Dev VPC with Public Access and ECS Cluster"

# create major version
result=`aws proton-preview
--endpoint-url https://proton.us-east-2.amazonaws.com
--region us-east-2
create-environment-template-major-version
--template-name "proton-example-dev-env"
--description "Version 1"`

major_version_id=`echo result | jq ."environmentTemplateMajorVersion"."majorVersionId" | sed 's/"//g'`
major_version_arn=`echo result | jq ."environmentTemplateMajorVersion"."arn" | sed 's/"//g'`

# compress and upload the environment templates package
tar -zcvf env-template.tar.gz environment/ && aws s3 cp env-template.tar.gz
s3://${artefacts_bucket_name}/env-template.tar.gz && rm env-template.tar.gz

# create minor version
minor_version_id=`aws proton-preview
--endpoint-url https://proton.us-east-2.amazonaws.com
--region us-east-2
create-environment-template-minor-version
--template-name "proton-example-dev-env"
--description "Proton Example Dev Environment Version 1"
--major-version-id "${major_version_id}"
--source-s3-bucket ${artefacts_bucket_name}
--source-s3-key env-template.tar.gz
| jq ."environmentTemplateMinorVersion"."minorVersionId" | sed 's/"//g'`

# wait until registration is complete
aws proton-preview
--endpoint-url https://proton.us-east-2.amazonaws.com
--region us-east-2
wait environment-template-registration-complete
--template-name "proton-example-dev-env"
--major-version-id "${major_version_id}"
--minor-version-id "${minor_version_id}"

# publish the environment template
aws proton-preview
--endpoint-url https://proton.us-east-2.amazonaws.com
--region us-east-2
update-environment-template-minor-version
--template-name "proton-example-dev-env"
--major-version-id "${major_version_id}"
--minor-version-id "${minor_version_id}"
--status "PUBLISHED"

# create the service templates
aws proton-preview
--endpoint-url https://proton.us-east-2.amazonaws.com
--region us-east-2
create-service-template
--template-name "lb-fargate-service"
--display-name "LoadbalancedFargateService"
--description "Fargate Service with an Application Load Balancer"

# create major version
major_version_id=`aws proton-preview
--endpoint-url https://proton.us-east-2.amazonaws.com
--region us-east-2
create-service-template-major-version
--template-name "lb-fargate-service"
--description "Version 1"
--compatible-environment-template-major-version-arns ${major_version_arn}
| jq ."serviceTemplateMajorVersion"."majorVersionId" | sed 's/"//g'`

# compress and upload the service templates package
tar -zcvf svc-template.tar.gz service/ && aws s3 cp svc-template.tar.gz
s3://${artefacts_bucket_name}/svc-template.tar.gz && rm svc-template.tar.gz

# create minor version
minor_version_id=`aws proton-preview
--endpoint-url https://proton.us-east-2.amazonaws.com
--region us-east-2
create-service-template-minor-version
--template-name "lb-fargate-service"
--description "Version 1"
--major-version-id "${major_version_id}"
--source-s3-bucket ${artefacts_bucket_name}
--source-s3-key svc-template.tar.gz
| jq ."serviceTemplateMinorVersion"."minorVersionId" | sed 's/"//g'`

# wait until registration is complete
aws proton-preview
--endpoint-url https://proton.us-east-2.amazonaws.com
--region us-east-2
wait service-template-registration-complete
--template-name "lb-fargate-service"
--major-version-id "${major_version_id}"
--minor-version-id "${minor_version_id}"

# publish the service template
aws proton-preview
--endpoint-url https://proton.us-east-2.amazonaws.com
--region us-east-2
update-service-template-minor-version
--template-name "lb-fargate-service"
--major-version-id "${major_version_id}"
--minor-version-id "${minor_version_id}"
--status "PUBLISHED"
How do I use this as a developer?
Switching to the developer, the first step is to create the environment.
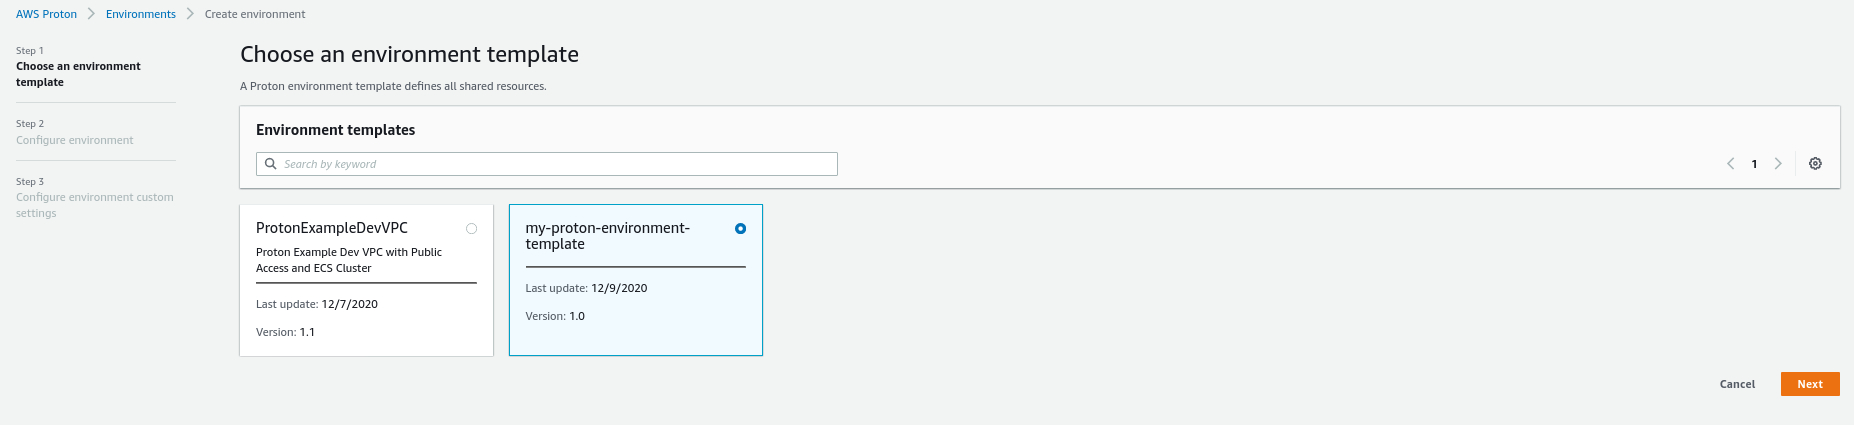
- Go to AWS Proton console and select Environments and click Create environment.

- Choose the environment template that you want and click Configure.
- Fill in the form with the repository name and select the role that we created previously.
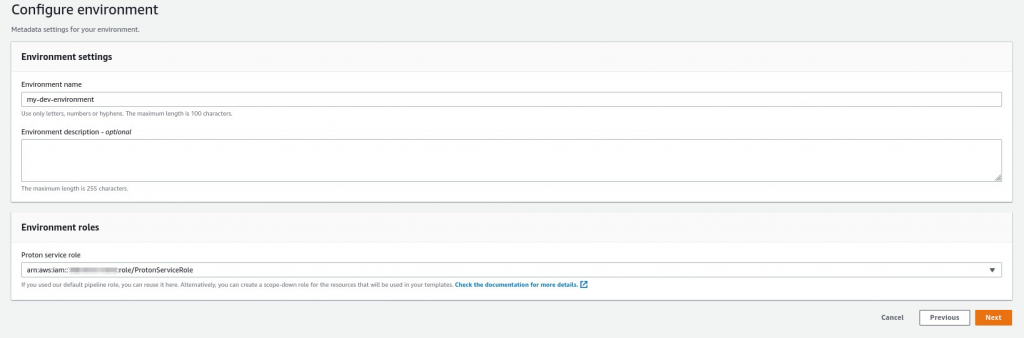
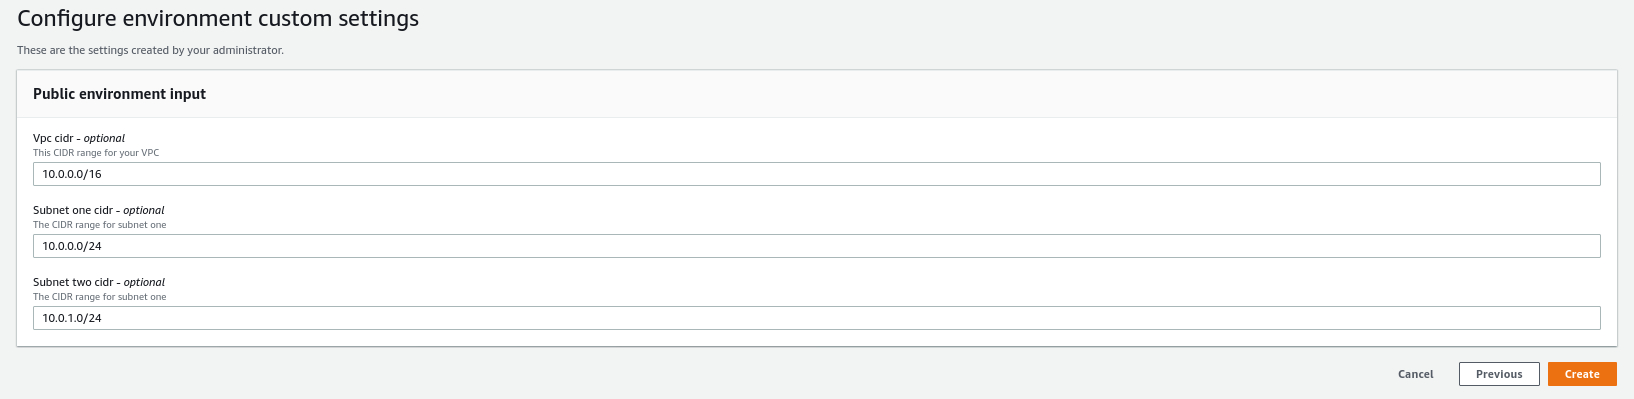
- In the next page, put in the template parameters and click Create.
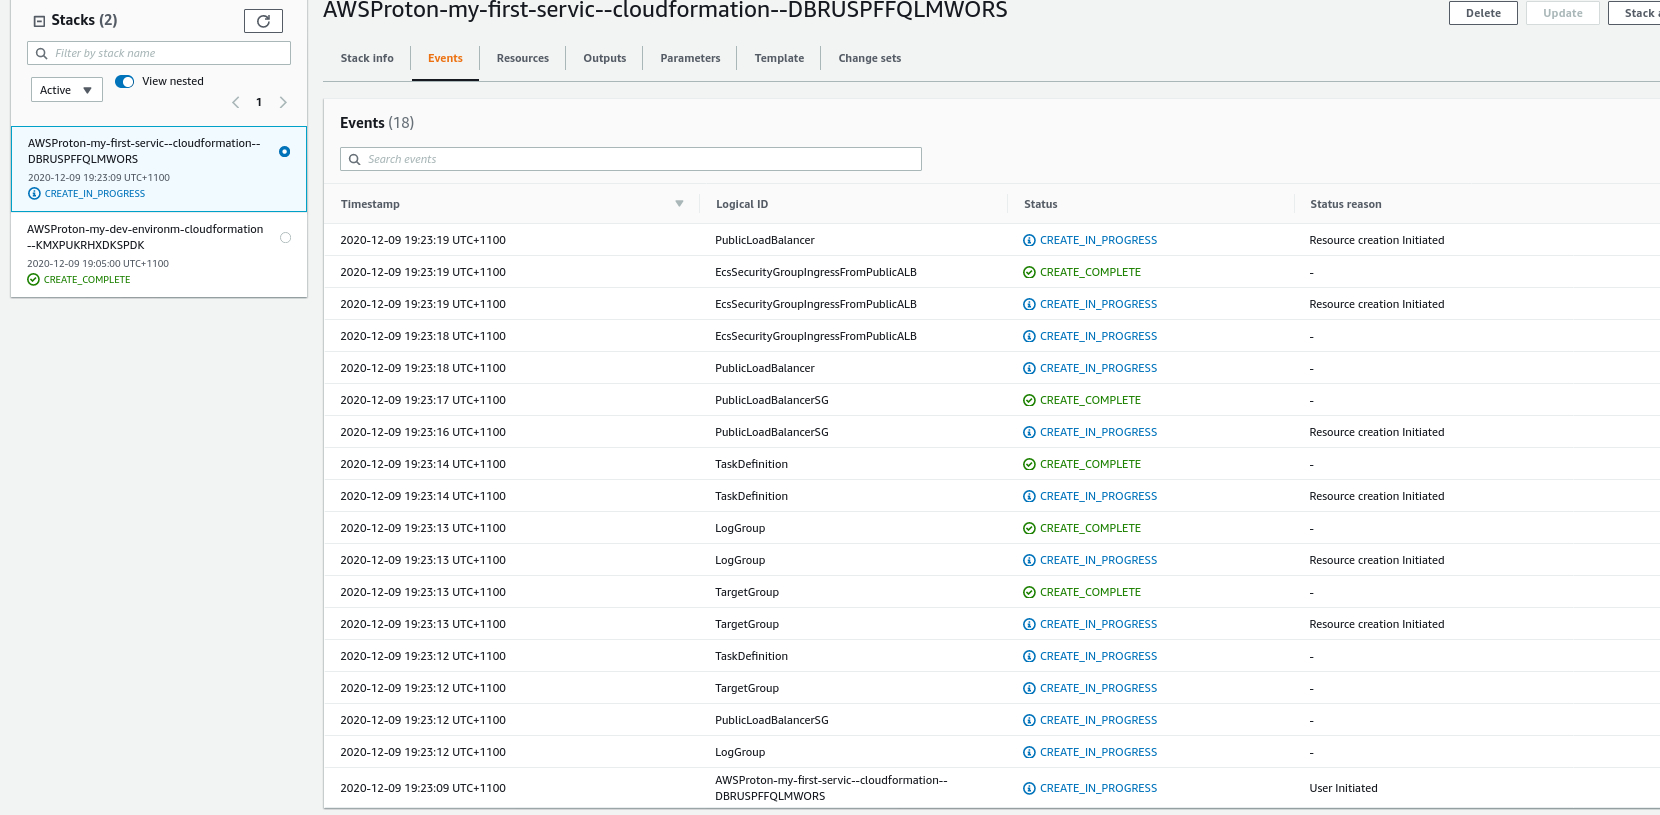
 At this point, Proton will deploy the resources from your template. You can watch the progress in CloudFormation.
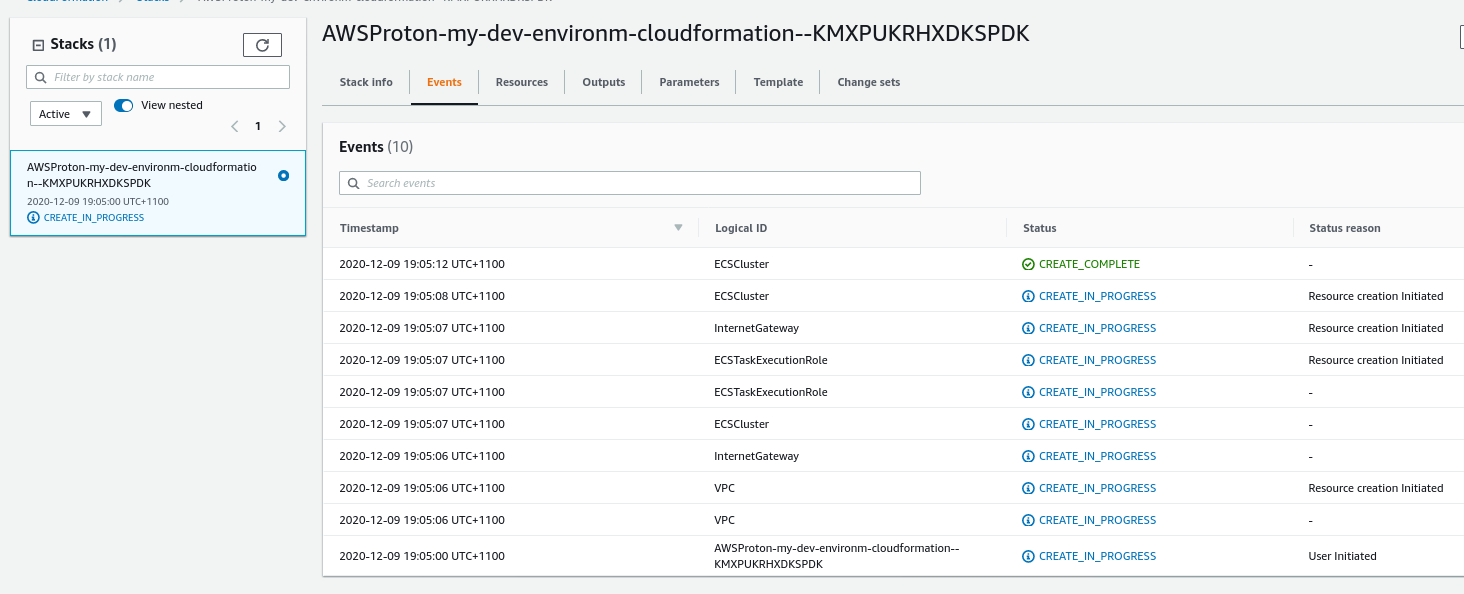
Service creation
The next step is to create the service.
- Go to AWS Proton console and select Services and click Create service.
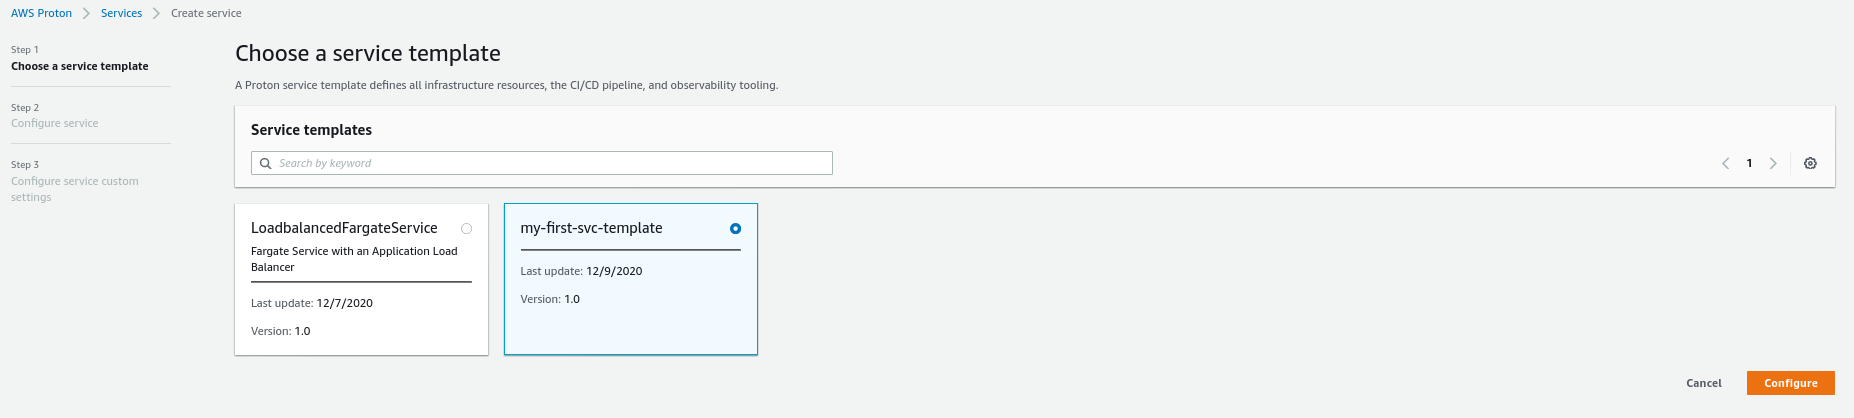
- Choose the service template that you want and click Configure.
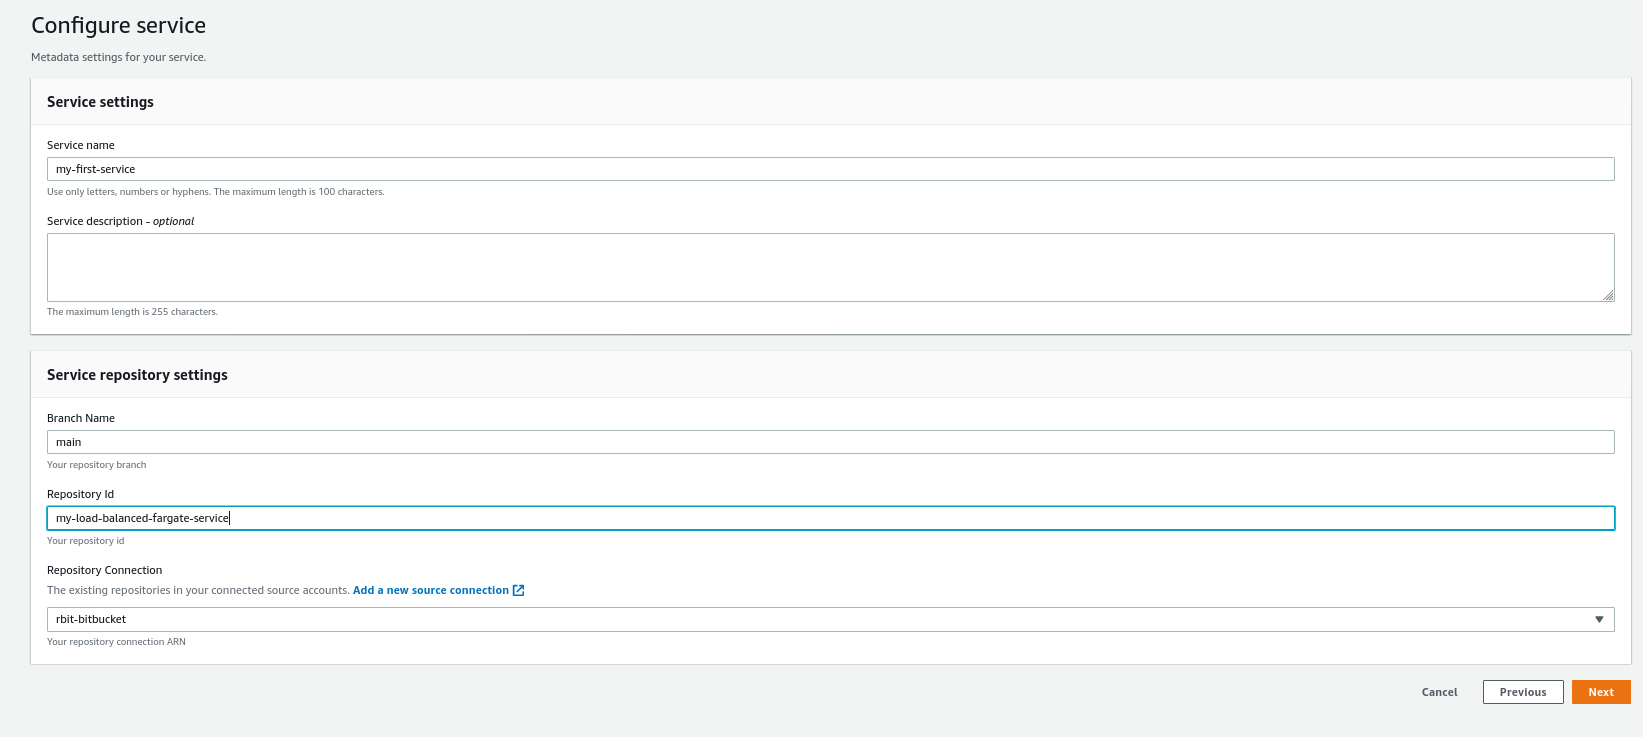
- Fill in the form with the repository name and select the VCS connection. If there is no existing connection, click Add a new source connection. In our case, we already have connections to Bitbucket and Github. As a result, we simply select the connection where the repo is stored.
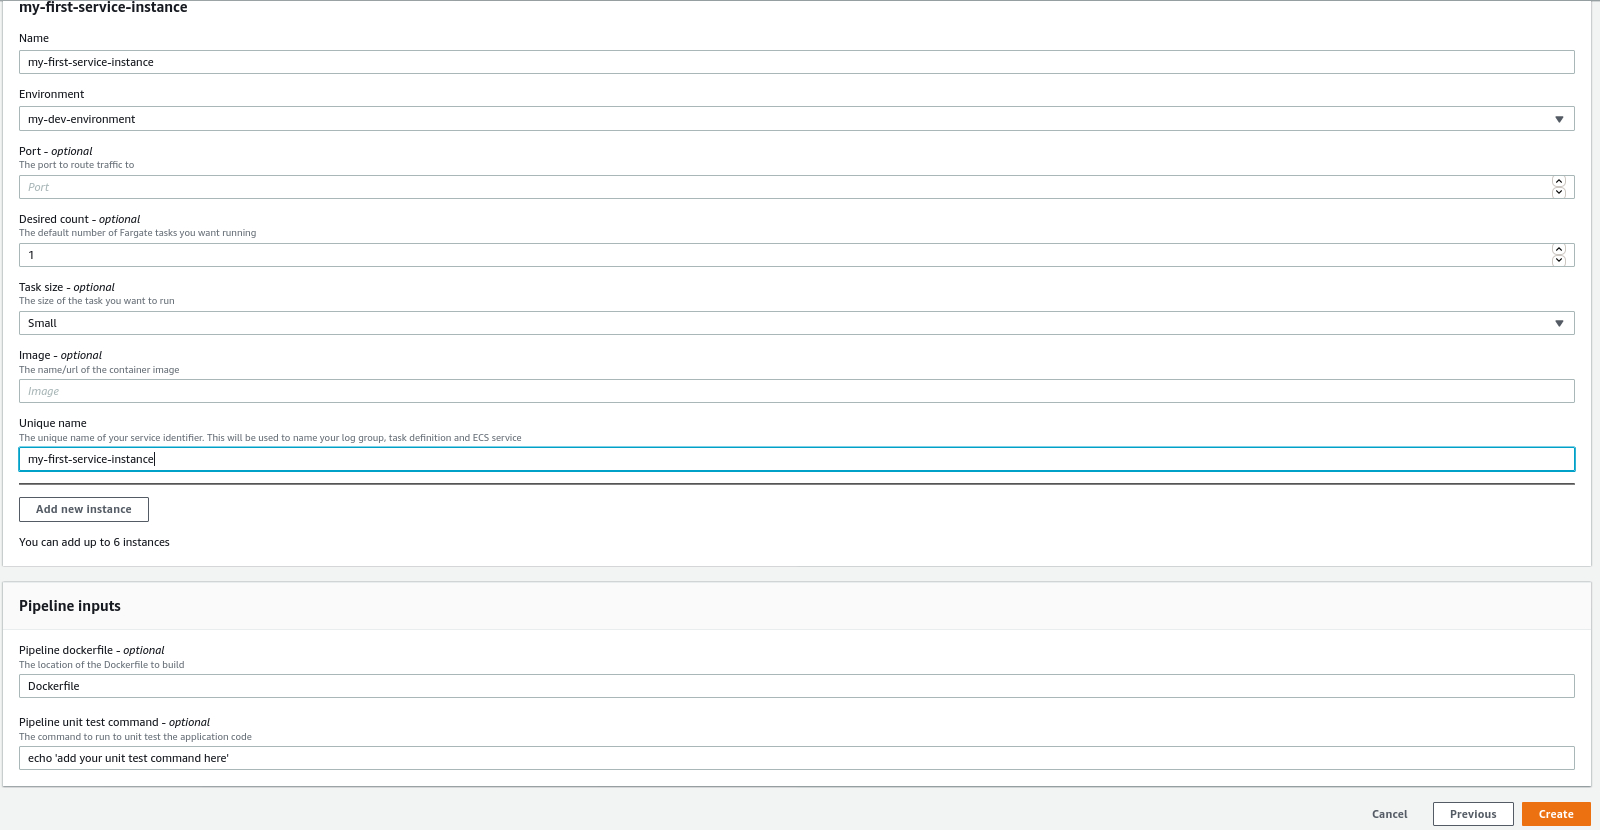
- On the next page, click Add new instance. You can deploy multiple instances of the service. Put in the required template parameters and click Create.
 Again this will deploy the resources in your template. You can check the status from CloudFormation.
It also creates the Pipeline that will be used to deploy your application. All you need to do now is to commit your code into the repository that you defined in the previous steps. Any push to the repo will trigger the pipeline and deploy your application accordingly.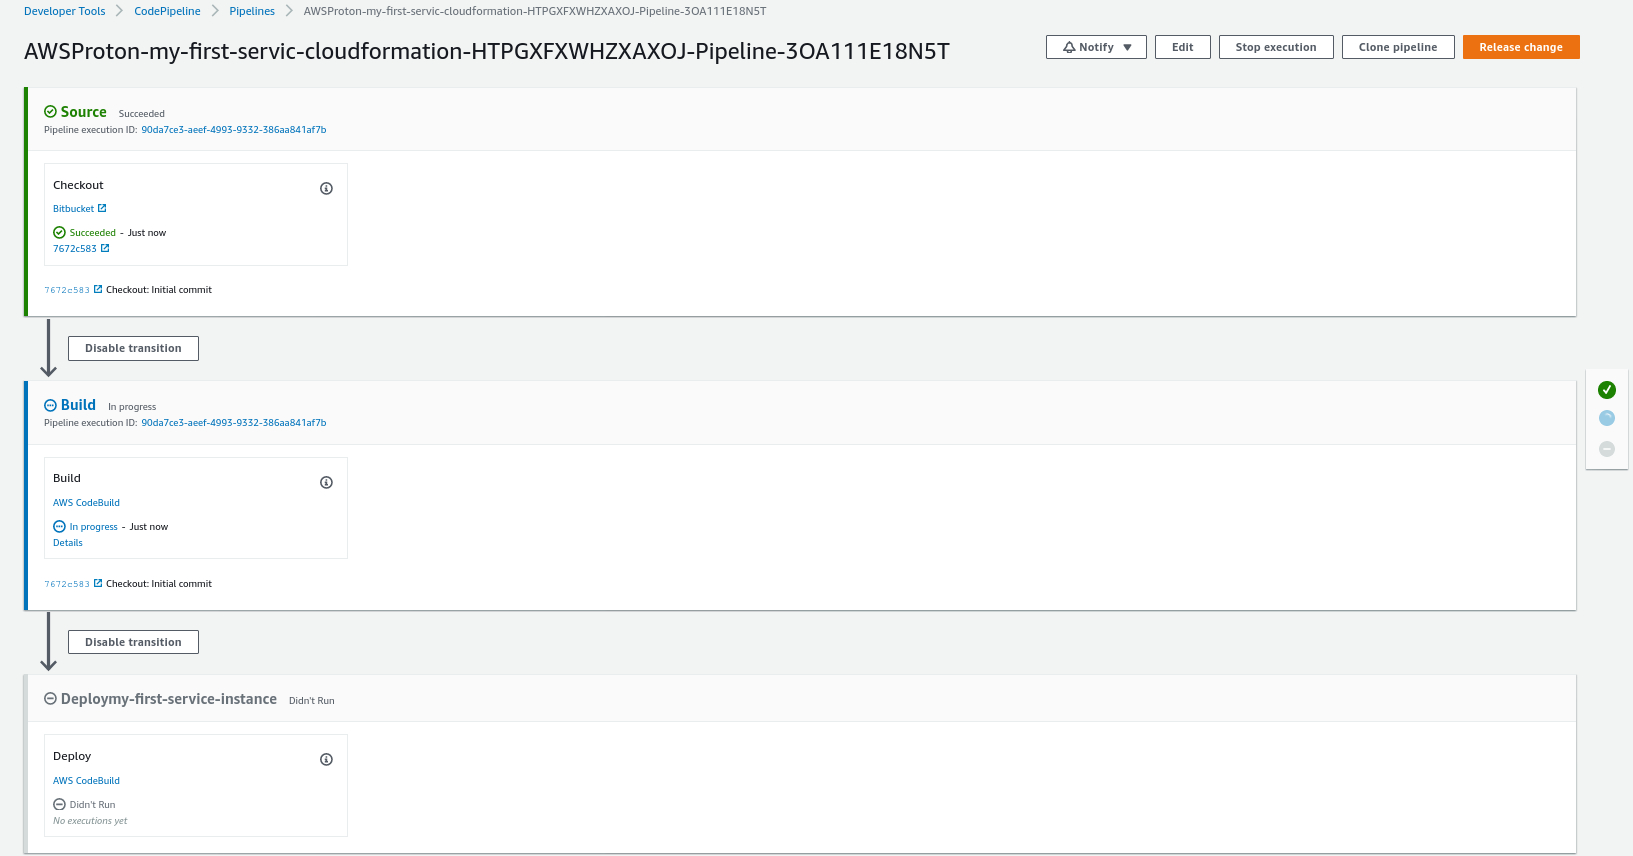
That’s it! It’s that simple to deploy the service from the end user’s perspective. Naturally, as with all AWS services, you can use the AWS CLI or the API to create Proton services and environments.
How does it differ from Service Catalog?
There is an obvious overlap between AWS Proton and Service Catalog in terms of functionality. Service Catalog can be used to deploy CloudFormation templates and also allows combining multiple products by way of Provisioned Product outputs where you can obtain outputs from a provisioned product in a CloudFormation template.
Proton simplifies that for the end user (developers) so that they only need to deploy the service that they want with just a few clicks. All the resource needed like the pipeline, networking and log configuration are created by the service itself. As an end user, you do not have to worry about which product you need to deploy first, for example. As a result, the user experience is much improved using Proton.
Can we reuse our existing environment?
Environments created outside Proton cannot be used, at least not with this initial release. However, support for this is in the roadmap along with support for Terraform.
Proton creates hard dependencies between the environment templates and the service templates by way of CloudFormation outputs. In fact, when we create the service template, the compatible environment template ARN is a required argument. It’s the cost of abstracting away the complexities for the end user.
The verdict
Overall, AWS Proton is a well thought out product. The key feature that we like include
- Self service interface;
- Template management;
- Streamlined upgrades using versioning;
- Automated deployments;
- Integration with CloudWatch and CI/CD.
While it is a useful new service, it is not the revolutionary one we initially hoped it might be when it was when first announced. Platform engineers still need to build and maintain the templates for their use cases. Sadly, they still have to manage the permissions between resources in those templates.
What AWS Proton current provides can already be done with Service Catalog. However, it simplifies and streamlines the whole process. Making the process simpler for the end user is in itself a big and important improvement. Not to mention the fact that it enforces best practices like CI/CD, observability, scalability and security. The potential integration with Service Catalog (a feature in the pipeline) is also a big benefit. Being able to import Service Catalog products into Proton will make it easier to migrate workloads.
We believe that by the time it becomes GA, and the AWS Proton team has listened to customer feedback, this service will only become more powerful.
We can definitely see ourselves using Proton for our customers, particularly once we can import existing environments.