The AWS Network Firewall was announced last week. It’s a new service for AWS VPCs that provides a high availability, managed network firewall. It’s features include stateful inspection, intrusion prevention and detection, and web filtering to protect your virtual networks on AWS. It is delivered as a fully managed service. This means that it automatically scales with traffic, ensuring high availability for the service.
It’s a pretty exciting new service, announced pre-(virtual) re:Invent, so we thought we’d have a look at getting it up and running into an existing environment.
The current environment
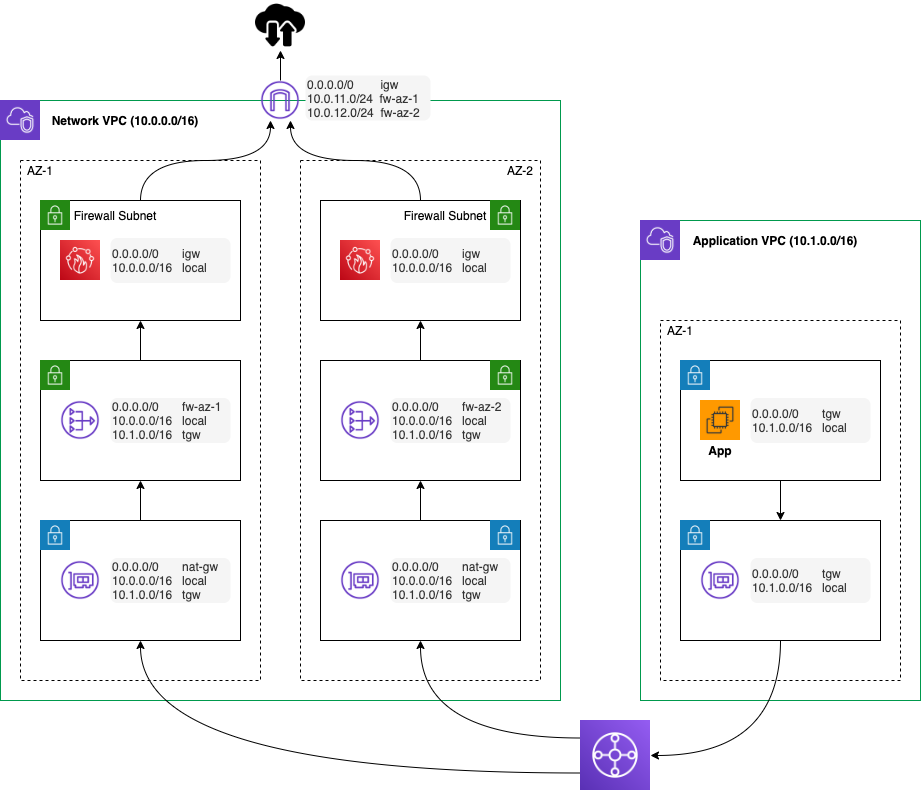
For our customers, we prefer a multi-account/VPC model. In this model, we generally centralise the Internet ingress/egress using Transit Gateway, NAT Gateways and third party appliances, if required. It typically looks like this (this is a simplified version).
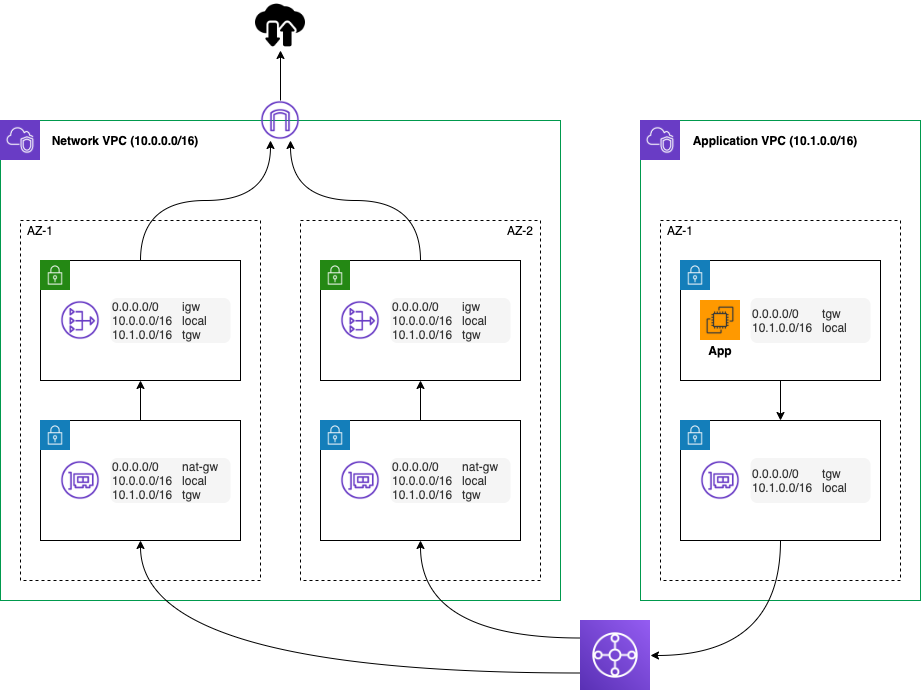
In this model, we can control which VPCs and subnets have access to the Internet through routing and save cost through shared services. However, we can’t filter that access to a URL or via content level. That’s where the firewall comes into play! In this case, we want to use the firewall policy to control the access to and from the Internet (often called north-south traffic).
Preparing for the Network Firewall
Before we get started, there are a few concepts to understand!
- The firewall – operates as a transparent “bump in the wire” via VPC endpoints;
- A firewall policy defines the behaviour of the firewall in a collection of stateless and stateful rule groups. A firewall can only have one associated policy;
- A rule group is a collection of stateless or stateful rules that define how to inspect and handle network traffic.
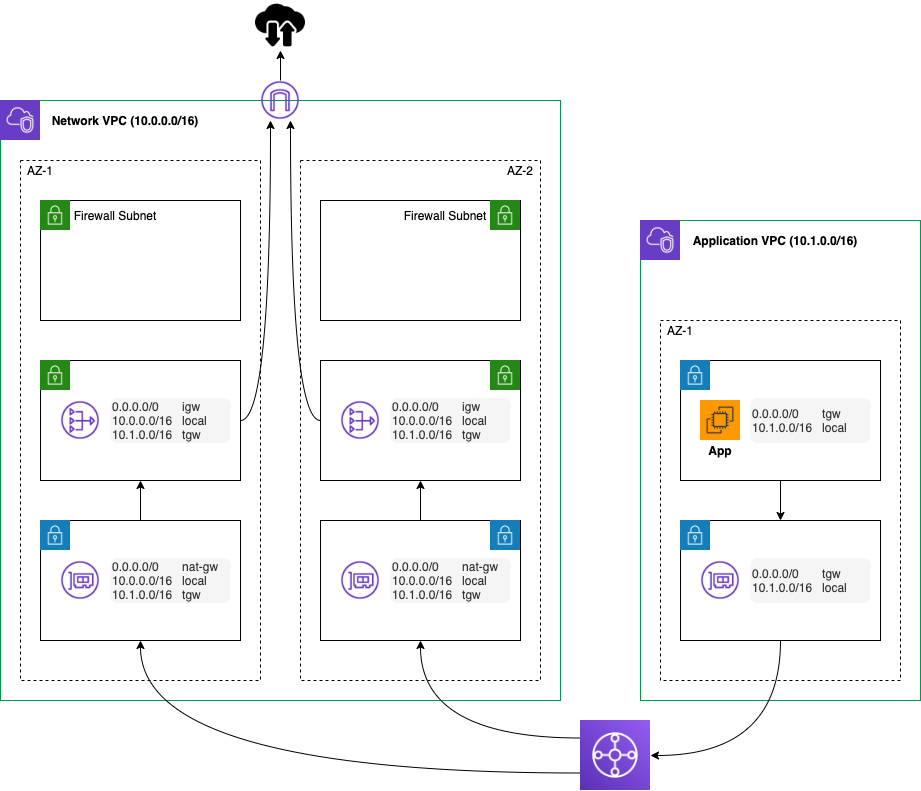
In our environment, we are going to spin up the firewall in the Network VPC. However, first we need to create new subnets for the Firewall endpoints. We can’t use the existing NAT public subnets as we need to route traffic to and from the firewall. Note that the Network Firewall does not perform any NATing of IP addresses! As we will still need the NAT gateways, we need the seperate firewall public subnets. Let’s create these subnets so our picture has now changed to the following.
Firing up the firewall
It’s very simple to start the firewall. From the VPC console, select the AWS Network Firewall and click on Create firewall. If we want to get started with a new (empty) firewall policy, we just need to select the VPC and the new firewall subnets. The firewall will then be available within a few minutes. We could at this point plumb in the firewall and off we go. We will, though, have a pretty expensive (virtual) cable! No doubt, like us, you’ll want to setup at least a basic policy and rulesets, too!
Building the policy
A policy has two types of associated rulesets. A policy can have multiple rulesets. Let’s have a look at the highlights of the policy capabilities.
- Stateless rulesets. Each packet is inspected in isolation, without consideration to the direction of the traffic or whether the packet is part of an existing, approved connection. It takes rules with the standard 5-tuple format. The stateless rules are similar in behaviour to VPC network access control lists (ACLs). Stateless rulesets are evaluated before stateful rulesets;
- Stateful rulesets. Each packet is inspected in the context of the traffic flow. This allows us to use more complex rules, log network traffic and log firewall alerts on traffic. Stateful rules consider traffic direction. The stateful engine can use rules that are compatible with Suricata. Stateful rules are more akin to security groups. However, they provide for more sophisticated inspect capability.
Sticking to the rules
The firewall first evaluates the stateless rules. If a rule matches, the defined action for that rule is performed. The default behaviour for stateless rules defined in the policy is followed if no rules are matched. This can be one of drop, accept or forward for stateful processing. We can also create a custom action that sends a CloudWatch metric. We could use this to trigger some action, such as a Lambda function to perform some automation.
The stateful rules can take one of three formats.
- 5-tuple format but with the additional option to specify traffic direction;
- Allow and deny (whitelist and blacklist) rules for domains. This includes support for wildcards and protocols (HTTP and/or HTTPS);
- Suricata compatible rules. Suricata is an open source intrusion prevention system (IPS). This provides some pretty sophisticated capability such as detecting tunnelling. For example, this rule will detect non-TLS traffic on port 443.
alert tcp any any -> any [443] (msg:"Detected non-TLS on TLS port"; flow:to_server; app-layer-protocol:!tls; threshold: type limit, track by_src, seconds 90, count 1; sid:210003; rev:1;)
We will dig deeper into the rulesets in a future blog but for now we will press on.
Let’s talk about capacity!
We have gone ahead with a plan for a simple stateful ruleset to allow outbound access to HTTP and HTTPS. For now, we will leave the stateless rule group empty with a default action to forward for stateful inspection.
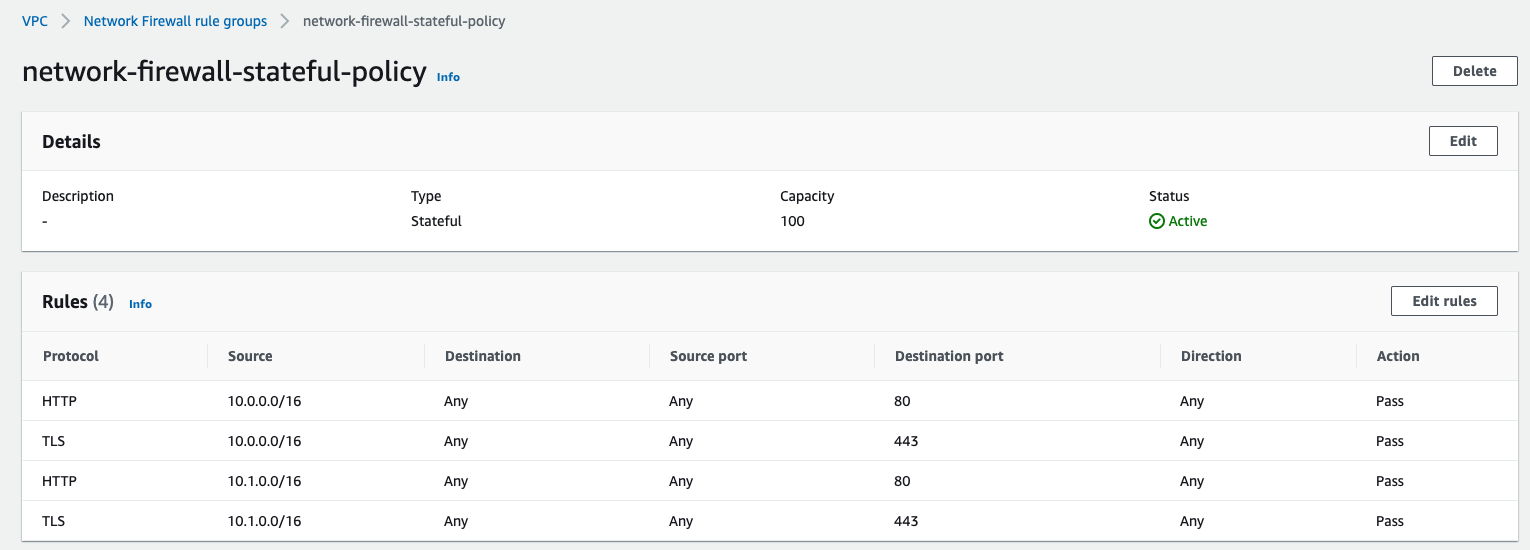
When we create a ruleset, it’s easy to miss the Capacity. The capacity is used to pre-provision processing capacity for the ruleset. The default is 1 and we can’t change it once we have created it! For stateless rules, the capacity is defined by the number of rules and the complexity of the rules. A rule with two protocols will use 2 capacity units. Similarly, a rule with 3 source CIDR ranges will use 3 capacity units.
For stateful rules, the capacity equates to the number of rules.
Chose wisely! The obvious answer may be to simply provide an enormous capacity number. However, there are regional limits for the Network Firewall!
Plumbing it in
Looks like we are ready to go. Suffice to say, we want to test our rules before we push any production traffic through it!
We will need to modify the routing for both inbound and outbound traffic. First, lets direct outbound traffic through the firewall endpoints. To do that, we modify the default route used by the NAT gateway subnets to point to the relevant Network Firewall endpoint in the AZ.
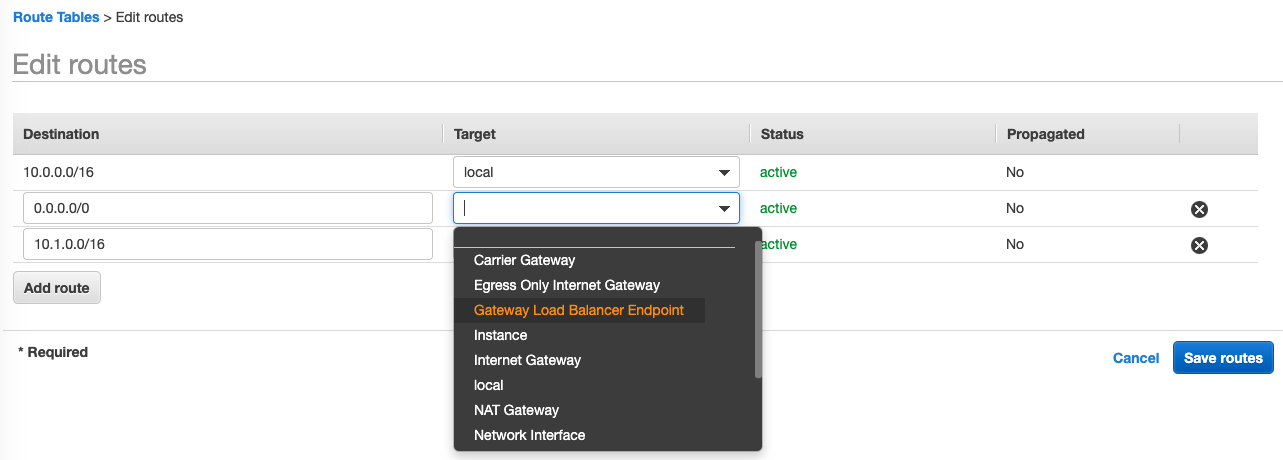
Except, there isn’t one listed! The firewall endpoints actually use the Gateway Load Balancer as part of the underlying technology so we have to select these endpoints.
Next, create a new route table for the Firewall subnets and associate the subnets with it. Assign it the Internet Gateway as the default route.
How about ingress routing? All inbound traffic also needs to pass through the firewall. But, how do we route traffic from the Internet Gateway? VPC Ingress Routing is our friend!
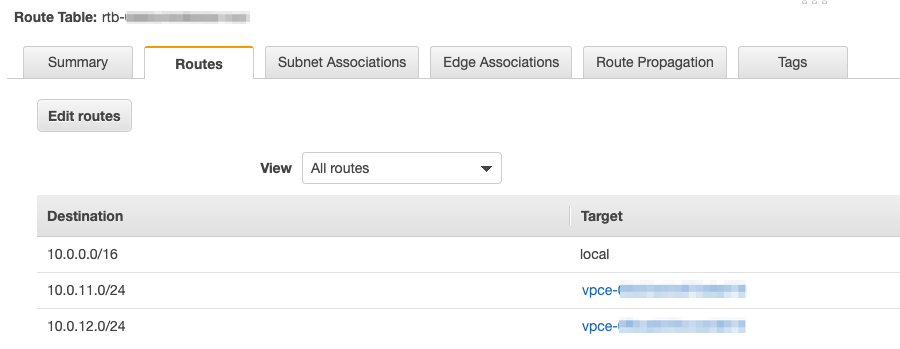
First, we create another route table, this time for the Internet Gateway. We don’t associate it with any subnets. For ingress routing, we use the Edge associations tab and associate it with the Internet Gateway. We add routes to the two firewall endpoints using the CIDR ranges of the subnets, as below.
The final routing setup is now configured as follows.
Time to test
We spin up an EC2 instance in the Application VPC in the private subnet. Using Session Manager, we can get a shell and then attempt to access the RedBear website. Success!

What about the cost?
Sadly the service doesn’t come for free! You can find the full pricing on the service product page.
For 3 AZ endpoints, the cost is $850 per month plus traffic charges (at $0.065/GB). If you are running the Network Firewall though, you don’t have to pay for NAT Gateways so that brings the differential down to about $750 on top of running just NAT Gateways. This is US pricing as the service isn’t available in the Sydney region yet.
Going further
We are pretty excited about the opportunity to automate the firewall policy as code. It’s a service we have wanted from AWS for a while. There’s a fantastic AWS blog post that covers a whole range of deployment models for different scenarios that is well worth a read.
Look out for a future post where we delve into the rulesets and explore the different capabilities.
If you are interested in what the AWS Network Firewall can do for you, please get in contact with us at RedBear.
