With a move to remote working as a result of the COVID-19 pandemic, organisations are looking for solutions that can provide a secure and simple experience. One of the common ways to ensure secure communications when home working is through a VPN solution. It also has the advantage of providing an “on the corporate network” experience for remote workers.
In recent times, IT departments have been challenged with supporting remote workers rapidly. Many questions need to be answered. Do you have the ability to scale your VPN for your teams? Do you have a significant upfront cost for additional licenses? Would you rather pay for a VPN on a pre-usage basis? The AWS Cloud may be your answer.
AWS Client VPN
AWS Client VPN is a fully-managed and scalable VPN solution running on the AWS Cloud. It automatically scales connections based on user demand. Access to both AWS and on premises resources can be configured. A free AWS VPN client is also available although you can use any OpenVPN based client software. For authentication, you can integrate Client VPN into your AD solution (including support for MFA), whether that be a Cloud, Azure AD or on-premises based AD environment. Alternatively, you can use a mutual certificate approach to authentication.
In addition, Client VPN supports split VPN tunnels for when you only want to direct traffic designated for your corporate environments through the VPN, reducing potential traffic for Internet based access, for example.
That all sounds good but what if you aren’t an AWS customer or you aren’t currently running workloads in the AWS Cloud? AWS Client VPN can still provide a scalable VPN for your organisation. In this case, think of it as a scalable VPN proxy to your on-premises environments. All you need in AWS is a basic virtual network and the Client VPN service. You can then connect any other destination via an Internet VPN or via Direct Connect.
Building a scalable VPN solution
So, how do you get going and build the solution in the AWS Cloud? We will step you through the implementation with the following architecture in mind. In this solution, we are using Azure AD as the identity provider.

The solution uses the following AWS components:
- An AWS site-to-site VPN to connect to Azure;
- The AWS Client VPN to provide the VPN to remote workers;
- An AWS Directory Service AD Connector to provide a proxy to Azure AD.
We are re-using the Azure AD configuration and site-to-site VPN that we setup for Amazon Workspace in our previous blog. As a result, we are assuming the existence of a basic AWS network environment. If you don’t have that, we can help you to get started quickly.
We are fans of automation and everything as code so we have developed a CloudFormation template that will setup all the AWS services for the Client VPN solution. Here, though, we will concentrate on the step-by-step setup.
Enabling the Client VPN
Creating a Client VPN involves the following steps.
- Create certificates;
- Enable the VPN Endpoint;
- Configure access and routing;
- Download the client configuration;
- Test!
Creating the certificate
Before you can enable a Client VPN endpoint, you need to create a certificate for the server end. If you are using mutual authentication, you will need to create a certificate for the client end as well. Client VPN supports 1024-bit and 2048-bit RSA key sizes.
If you don’t already have a CA for your organisation, the recommended way is to install OpenVPN easy-rsa (for Linux, MacOS or Windows). Here we are using MacOS. You can install easy-rsa by cloning it from github using
git clone https://github.com/OpenVPN/easy-rsa.git
Setup up a new CA.
cd easy-rsa/easyrsa3
./easyrsa init-pki
./easyrsa build-ca nopass
Create the server certificate and key. Note that since we are using Azure AD for authentication, we don’t need to generate a client certificate.
./easyrsa build-server-full client-vpn-server nopass
Import the certificate into AWS Certificate Manager. Copy the section
-----BEGIN CERTIFICATE-----
1234abcn
-----END CERTIFICATE-----
from the file pki/issued/client-vpn-server.crt and paste it into Certificate body text box.
Similarly, for the private key, copy the section
-----BEGIN PRIVATE KEY-----
1234abcn
-----END PRIVATE KEY-----
from the file pki/private/client-vpn-server.key and paste it into the Certificate private key text box.
Finally, for the certificate chain, copy the section
-----BEGIN CERTIFICATE-----
1234abcn
-----END CERTIFICATE-----
from the file pki/ca.crt and paste it into the Certificate chain text box.

Make a note of the ARN as you will need it for the endpoint configuration.

Establishing the endpoint
In the AWS Console, switch to the VPC dashboard and select the Client VPN Endpoints. Click on Create Client VPN Endpoint. Provide the following details.
- Client IPv4 CIDR – the IP range that will be allocated to the endpoint using the VPN;
- Server certificate ARN – the certificate from above;
- Select Use user-based authentication and chose the AD Connector Directory ID;
- It is recommended to log the connections to CloudWatch. If so, choose an appropriate log group;
- If desired, click Enable split-tunnel;
- Optionally, you can set the DNS servers to use such as the AWS DNS servers or any other of your choosing;
- Select the VPC to associate with the endpoint;
- Select the Security Group to associate with the endpoint.

Configure access and routing
The next step is to associate the endpoint with one or more subnets. We recommend using two subnets in different availability zones for redundancy. To associate the endpoint, select the Associations tab for the newly created endpoint and click on Associate. Select the VPC and an appropriate subnet. Repeat the steps for a second subnet in an alternate AZ. A route to the VPC CIDR range will be added automatically for each association. Note that at the time of writing, only 2 of the 3 AZs in the Sydney region (ap-southeast-2) currently support Client VPN endpoints.

We also need to authorise clients to access target networks. Create an authorisation rule for each network that we want to allow the clients to connect to. This can be within AWS or on-premises. Note that you need to authorise all destination networks, not just those within the VPC. In our case, we are allowing access to the local VPC and to Azure. Select the Authorization tab and click on Authorize access for each network. You can also restrict access to a specific group of users, as identified by an AD SID.

Finally, configure routing to the other connected networks. In our case, we are creating a route to Azure. The route to a CIDR is associated with a subnet. Your connection will then use the subnet’s route table to route traffic to the appropriate next hop or destination. Select the Route Table tab and click on Create Route for each destination network. As with associations, we recommend creating a route via at least two subnets in seperate AZs.

Check the route table in the destination subnet has routes to the appropriate destinations. In this case, we have a site-to-site VPN to Azure in the route table, identified by vgw-xxxxxxx as the target.

Download the client configuration file
For clients to connect via the VPN solution, client software requires a configuration file. Note that since we aren’t using mutual authentication, the client certificate is not required. Download the file by clicking on Download Client Configuration. Edit the downloaded file and add a prefix to the DNS name located as the remote value. The prefix can be any string such as myvpn. For example the line
remote cvpn-endpoint-XXX.prod.clientvpn.ap-southeast-2.amazonaws.com 443
would be changed to
remote myvpn.cvpn-endpoint-XXX.prod.clientvpn.ap-southeast-2.amazonaws.com 443
Check that you can resolve the DNS name.

Test!
Fire up your OpenVPN client and import the configuration file. If you don’t have a client, you can download the AWS VPN Client.
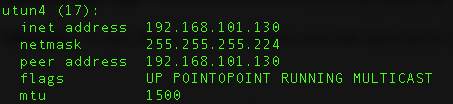
Start your connection, enter your Azure AD credentials and you are in! We can see an established VPN connection and associated IP on the local machine. You can also check the Connections tab in the AWS console.
Now let’s try and ping a machine in Azure and one in the local VPC.
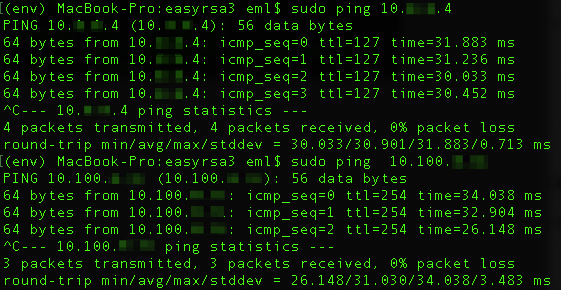
Success! Congratulations, you now have a working VPN solution that can be scaled to as many remote workers as you need.
Anything I need to know?
As you can see, getting up and running is a relatively simple process. You are only charged for the subnet associations per hour and connected sessions. That means that overnight, if no-one is using it, you only pay for the associations. There is no upfront software license cost.
The majority of work in getting you up and running will be making sure that you have network connectivity to the environments to which you need access. Again, with AWS services that is a relatively simple and quick task. If you can configure a VPN in your on-premises environment, we can have you up and running in hours!
As previously mentioned, we are fans of automation. For AWS services, we have CloudFormation templates that will automate this process (and any networks services) which we are happy to share.
If you would like a copy and to understand more about this VPN solution, please get in contact with us.